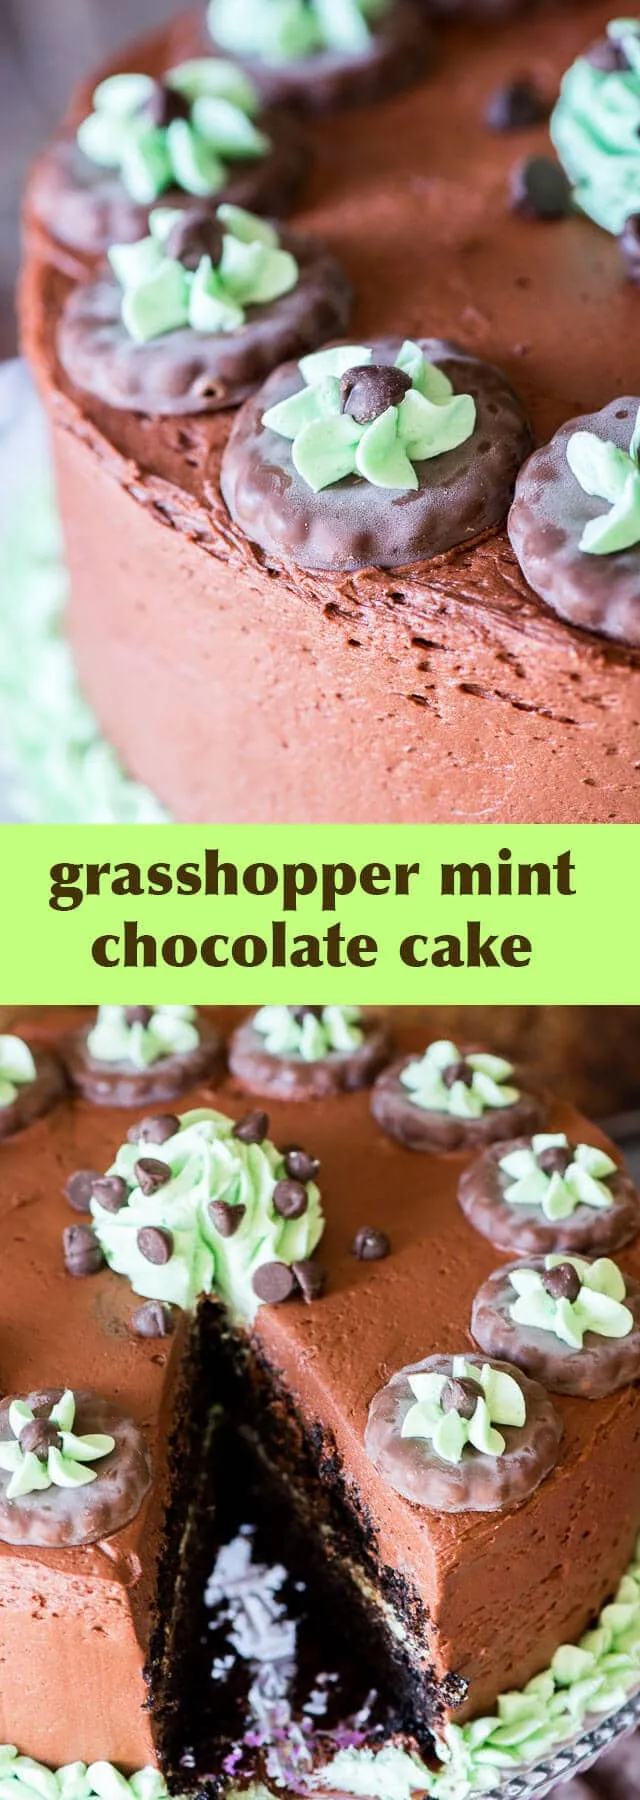
Get ready to tantalize your taste buds with the most irresistible dessert that combines the rich decadence of chocolate with a cool, refreshing mint twist! This Grasshopper Mint Chocolate Chip Layer Cake isn't just a dessert – it's a culinary experience that will transport you to a world of pure indulgence. Imagine cutting into a luscious chocolate cake studded with mini chocolate chips, layered with creamy mint buttercream that promises to make your dessert dreams come true. Whether you're hosting a special occasion or simply craving a show-stopping treat, this cake is guaranteed to become your new obsession!
Prep Time: 40 mins
Cook Time: 30 mins
Total Time: 1 hrs 10 mins
Cuisine: American
Serves: 10 servings
Ingredients
- 2 cups all-purpose flour
- 2 cups granulated sugar
- 1 cup unsweetened cocoa powder
- 1 teaspoon baking soda
- 1/2 teaspoon salt
- 1 cup buttermilk
- 1/2 cup vegetable oil
- 2 large eggs
- 1 teaspoon peppermint extract
- 1 cup mini chocolate chips
Instructions
- Preheat the oven to 350°F (175°C). Grease and line two 9-inch round cake pans with parchment paper, ensuring the sides are also lightly greased to prevent sticking.
- In a large mixing bowl, sift together the all-purpose flour, cocoa powder, baking soda, and salt. Whisk the dry ingredients to ensure they are well combined and free of lumps.
- In a separate bowl, combine the granulated sugar, buttermilk, vegetable oil, eggs, and peppermint extract. Whisk these wet ingredients until they are smooth and fully incorporated.
- Gradually pour the wet ingredients into the dry ingredients, stirring gently with a spatula until just combined. Be careful not to overmix, as this can result in a tough cake texture.
- Fold in the mini chocolate chips, distributing them evenly throughout the batter.
- Divide the batter equally between the two prepared cake pans, smoothing the tops with a spatula to ensure even baking.
- Bake in the preheated oven for 25-30 minutes, or until a toothpick inserted into the center comes out clean with just a few moist crumbs.
- Remove the cakes from the oven and let them cool in the pans for 10 minutes. Then, carefully turn out onto a wire rack to cool completely.
- Once cooled, level the cake layers if needed using a serrated knife to create a flat surface for stacking.
- Prepare mint buttercream frosting and green food coloring (optional) to decorate and fill between the layers.
- Place the first cake layer on a serving plate, spread a generous layer of mint buttercream, then top with the second cake layer.
- Frost the entire cake with the remaining mint buttercream, creating smooth sides and a decorative top.
- Optionally, garnish with additional mini chocolate chips or mint chocolate shavings around the edges or on top of the cake.
- Refrigerate the cake for at least 1 hour before serving to allow the frosting to set and flavors to meld together.
- Slice and serve chilled, enjoying the rich chocolate and refreshing mint flavors of this decadent layer cake.
Tips
- Room Temperature Matters: Ensure all your ingredients are at room temperature before mixing. This helps create a more uniform batter and ensures better incorporation of ingredients.
- Don't Overmix: When combining wet and dry ingredients, mix just until they're incorporated. Overmixing can lead to a tough, dense cake.
- Check for Doneness: Use the toothpick test to ensure your cake is perfectly baked. A few moist crumbs are okay, but the toothpick should come out mostly clean.
- Cooling is Crucial: Allow the cake to cool completely before frosting to prevent the buttercream from melting.
- Chill for Perfection: Refrigerating the cake for at least an hour before serving helps the flavors meld and makes for cleaner, more precise slices.
- Flavor Boost: For an extra mint kick, you can add a touch more peppermint extract, but be careful not to overpower the chocolate.
- Decoration Tip: Use a piping bag for a professional-looking frosting finish, and don't be afraid to get creative with chocolate chip garnishes.
- Make Ahead: This cake actually tastes even better the next day, so it's perfect for preparing in advance of a special event.
Nutrition Facts
Calories: 420kcal
Carbohydrates: 65g
Protein: 6g
Fat: 18g
Saturated Fat: 6g
Cholesterol: 40mg